Category: Weekly Reflections

This is the category to apply to your weekly reflection posts from the course.

Design Lab

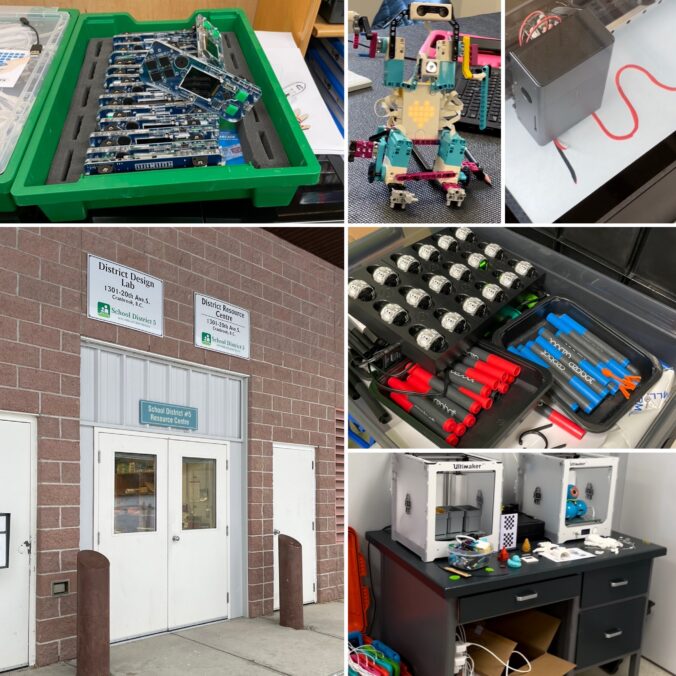
This week in class we check out SD5 DESIGN LAB and boy was it AMAZING! The district does such a great job of cultivating resources to engage our students and give them opportunities I could have only DREAMED of when I was in school.
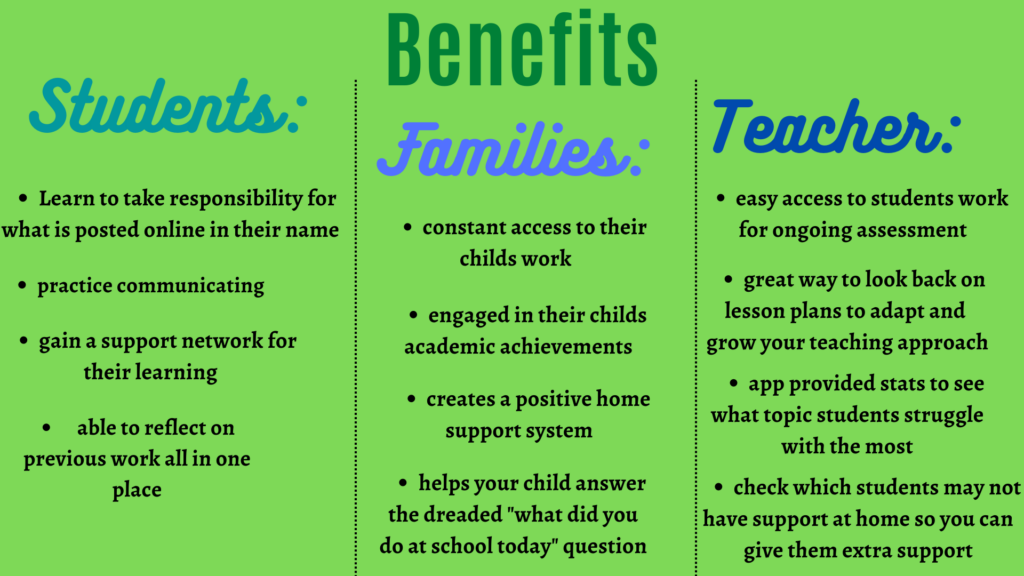
PROS

  • students engage with technology they may not otherwise have a chance to use
  • students collaborate to problem solve
  • practicum teachers are welcomed
  • design lab tries out technology to see how it can be incorporated in a classroom
  • great resources to help the teacher create and teach a lesson plan if they don’t have much experience with technology
  • student lead activity options
created on canva

CONS (What to be aware of before bring a class)

  • design lab books up early, be prepared to plan this months in advance to get a spot
  • students have varying level of technology expertise, how can you work to ensure every student is included?
  • funding needed to get students to the design lab (buses)

Something that stood out to me from the design lab was the tools for attaching cardboard together. I thought this could be a fun low tech project for younger grades to introduce them into technology.

Photo found on Unsplash by Jon Moore

I like the idea of using cardboard/ waste products to create something new and exciting. I think this would fit well into a lesson on RECYCLING.

I like how this project could be student lead. I think giving students plenty of CHOICE in learning is so important to their development.

I like how hands on the project is, this is great for keeping younger students fully engaged in an activity.

created on canva

Students would work in groups to create a house using any products they can find (great practice for students to be resourceful) and the given screws to hold challenging materials together. Students would be told to create the most sturdy house they can.

After creating the houses we would discuss what we think makes a building more or less sturdy. Create a list with the students hypothesis.

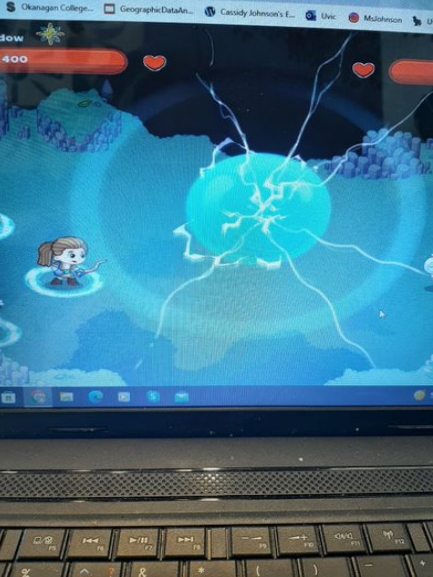
Students will then place their projects on the earth quake simulator to see how their building holds up.

After discuss the results. Ask the students again what makes a building sturdy.

Create larger groups and conduct another experiment with students using there new knowledge on how to make a building sturdy. See if the students new projects last longer on the earthquake simulator.

Digital Portfolio’s- Week 10

A digital portfolio is digitalizing student Artifacts. This involves posting student work online which is a great way to share with families what learning is happening in your classroom in real time!

What artifacts might you want to share?

PHOTOS

VIDEOS

VOICE RECORDINGS

DRAWINGS

DOCUMENTS

School & District -Subscriptions | Seesaw
Photo from their website

Seesaw is a great online site to create a digital portfolio for your students! Seesaw is very accessible with a desktop version, a free app and the ability to access straight on a mobile device. I really enjoyed how EASY TO NAVIGATE seesaw is because that makes it realistic for students to be successful on this device! I noticed how the teacher has control to adjust the settings so they can set all posts to be approved before posting as you begin to teach students what is appropriate to post online!

********My loyal blog readers may be wondering why Seesaw sounds so familiar well it was a part of my Assignment 2 What makes a good blog project! Check out my walk through tutorial if you have not had a chance yet!

created on canva

One way to use this in the classroom?

The LESSON PLAN: Students will use a digital portfolio like Seesaw to create a family free inquiry for Science class! Students would pick an animal of their choice to get the project started and share a photo, video or document explaining which animal they chose. Parents would comment a question they have about the animal and that question would be the topic of next weeks post on the topic! Continue for 5 weeks with the parents asking questions and the students conducting research and sharing the new information online with their parents!

CAREFUL: some students may not have a family that is able to support this project so the teacher would need to step up and share in those students learning!

BENEFITS:

  • students learn to do research to answer questions
  • students learn to share their learning using a digital portfolio
  • parents can learn alongside their child
  • students learn to report information in a clear manner
  • will great make discussion points at home while introducing seesaw to the students as well as their parents
created on canva

Prodigy As a Math Tool- Week 9

Today we explored prodigy as a classroom tool for teaching math. Prodigy is on online game intended to make learning fun! Students create characters in the game and explore the world by battling creatures and completing tasks. Prodigy can be used for Math or English but I have been playing to learn math so that will be the focus for today!

sample in game question

BATTLING in the game is done by answering math questions! If you get the answer correct your attack is successful and the opponent loses damage. If you get the answer wrong your attack misses. If a student is continuously getting questions wrong then the algorithm adjusts the questions to their knowledge level to ensure every student is learning!

my character attacking in the game.

ATTACKING in the game does damage to the opponent. The goal is for the opponent to lose all their health points before you to win. If you win you collect starts, new attacks and level up your characters!

completed quest screen in prodigy, take note of my characters there are so many to collect!

QUESTS can be completed in the game to earn more points and level up! As you continue to complete quests you also get chances to “catch” more creatures to add to your team. As you can see I already have Snowfluff and Rukus!

I found prodigy to be a lot of fun to play! By creating a STORYLINE to the game and QUESTS to complete I was eager to keep playing to grow more levels! This is a great MOTIVATION for students who may otherwise not engage in a math class! The game is super adaptable by the teacher to ensure students are sticking to the LEARNING OBJECTIVES. The teacher is able to set grade level and check the progress of the students. They can see who is playing, when they are playing and how they are doing within the game. The teacher can access statistics on which questions students tend to get wrong. For example if they notice students are getting 60% of the questions on division wrong the teacher will know to focus on division in the classroom!

PROS

  • engages students
  • adapts questions based off of student skill level
  • tracks student results for the teacher
  • addictive (I wanted to keep playing)
  • in game tools for drawing out the math problem- inclusive to lots of math strategies
  • fun
  • can continue learning at home

CONS

  • reward based learning, how will students react without getting points for correct answers (how to keep them motivated)
  • easy to cheat with access to a computer!
  • addictive (I wanted to keep playing instead of doing work)
  • requires access to technology for every student

Please check out my Screencastify for some live action game play!!!

scan the QR code to check out my screencastify

COMPUTATIONAL THINKING- Week 8

Computational thinking is a strategy for problem solving. There are four steps to computational thinking meant to provide order and intent to ones thinking in order to solve complex problems. Lets explore each of those steps:

STEP ONE DECOMPOSITION: Break down the problem into smaller, manageable pieces rather than attempting to look at the problem as a whole.

STEP TWO PATTERN RECOGNITION: Observe patterns within the problem. Are the pieces of the problem you broke up related (same cause)? This is an excellent time for learners to look to their previous knowledge to see how this could help them now. Has this happened before?

STEP 3 ABSTRACTION: Analyze the problem’s complexity. Pull out the significant details and only focus on the pertinent information. Ignore any details that do not directly affect your ability to solve the problem.

STEP 4 ALGORITHMIC THINKING: Create a set of rules required to solve the problem. Create a step by step plan to address the issues.

BC Curriculum:

Computational thinking can be brought into the classroom to help students with independence and group problem solving and it fits into the curriculum in a few different ways. I found there are ways to fit computational thinking into every core competency to varying degrees depending on the focus of your teachings.

Communicating Core Competencies
core competencies for the BC curriculum, the photo
was taken directly from their website

Teacher Talk (Vocabulary for Understanding):

Paired Programming: When students work together to code on a shared piece of technology rather than a 1:1 ratio of students and computers

Collaboration: students learn to work towards a common goal

Critical and reflective thinking: students learn to examine their own thinking

Personal awareness and responsibility: students learn to make constructive and ethical decisions

CORE COMPETENCY TEACHINGS WITH COMMPUTATIONAL THINKING:

COMMUNICATION: Computational thinking can be taught in small groups to solve complex problems the students are struggling with. A great example of this is paired programming which is an excellent way to teach collaboration under the bc curriculum.

THINKING: Computational thinking has thinking in the name so it must teach thinking right!?! Specifically I would categorize this under critical and reflective thinking. Students are learning how to analyze a problem, observe the problem, question when something goes wrong and learn from their mistakes!

PERSONAL AND SOCIAL: Computational thinking teaches students personal responsibility and independence. Giving students complex problems to solve and teaching them strategies to be successful rather than showing them how to fix it can be a frustrating act for the kids who get stuck. Allowing them to preserver by themselves fits into the BC curriculum under Personal Awareness and Responsibility as the students work on regulating emotions and managing their stress when they are thinking through complex problems. I always find when a student panics is when they lose sight of the goal. Computational thinking works on breaking a problem down into smaller pieces and completing things one step at a time which is important for stress management.

STOP MOTION VIDEOS- Week 7

Over the last couple weeks I have been creating some stop motion videos with the app Zing Studio! The first video I created was with fellow classmates and was my first time ever creating a video of my own. I am super proud of the work we created with our first attempt but there sure is room for growth! Check it out:

scan this QR code to check out the stop motion video we made with the students

The second video I created was with a group of 3rd grade students at a local elementary school. For this video we encouraged the students to control the themes and ideas and helped put their ideas into video. I was so impressed with how much the kids knew about stop motion video. They taught us how to add sound effects with was a fun feature we played around with!

WHAT DID I LEARN?

  • after my first attempt I learned how to add SOUND EFFECTS into the stop motion video
  • during our second video the kids wanted to stop our progress to DELETE a photo so we needed to quickly learn how to go back in and continue a started video
  • Prior to our first video we talked about limiting ourselves to only a FEW PROPS which is something we should have reinforced within the video with our students
  • dropping the “boulder” in our in situ video was a really cool idea the kids had, it took a few attempts to figure out the best way to MOVE AN OBJECT UP AND DOWN rather than side to side but I honestly think it looks awesome

Stop motion videos are created by taking a photo and then moving the subject a tiny bit and continuing to take a photo for each little movement made! I may use this technique in a classroom to have students explore an animal in their natural environment. I would tell the student to focus on 1 animal and 2 props to teach us either how the animal gathers food or where the animal nests. Another project that I could do with my students is share a story with the kids and have them use the same theme to create a unique story using stop motion. This would have a focus on parts of a story and using technology as a learning tool.

Object motion: made using objects, toys, (like lego) both my stop motion videos fit in this type

Claymation: uses clay for characters and background

Cutout animation: uses paper cut outs for characters and background

Puppet Animation: a puppet is used for the main focus of the video

Pixilation: stop motion is created using human subjects

Silhouette: characters are shown as black shadows

The information on these types of stop motion can be found here, this source has some great video examples of each type of video so I highly recommend checking it out!

Photos Used (listed from left to right):

Found on Unsplash by Daniel K Cheung

Found on Pexels by Cup of Couple

Found on Pexels by Artem Podrez

Found on Pexels by Vlada Karpovich

Found on Unsplash by Khamkéo Vilaysing

Found on Unsplash by William Farlow

Graphic Creations with Canva- Week 6

This week we practiced using online tools to create graphics! I was introduced to CANVA and was impressed by how easy the site was to use. The first thing I created was a mind map with the ice breakers I have used so far in my free inquiry.

I created this graphic using the template Abstract Mind Map Connection Diagram. I posted my graphic to Instagram as an easy way for my followers to get a quick view of what I am creating on my blog! The purpose is to generate interest using fun colours and key terms.

TEMPLATES:

I enjoyed how canva has a ton of options for templates so you are not required to create your entire graphic from scratch. I appreciate having the option because using a template is not always the best choice, depending on your abilities with canva and what you are trying to create.

POSITIVES NEGATIVES

generates ideas if you know what you need the graphic but do not know how to create one

great starting point for a project

super easy to use

categorized based off of potential needs to help organize your search

some of the templates I wanted to use cost money

limits what you can create if you start with a template (certain designs may be better creating from a blank canvas)

categories can be used for other things (my header image started as a wedding print) so using the categories limits choices

The graphics I created were used to enhance my blog but canva can also be used as an exciting CLASSROOM TOOL. I may create graphics to embed into a slide show to improve my students understanding. I could create EFFECTIVE IMAGES that show the student what I am trying to explain. Some students may learn better by seeing but other students may learn better by reading. Providing text and a graphic together will reach more of your classes LEARNING STRATEGIES for success.

Free Structure of Infusoria organism drawn on whiteboard with markers in classroom of school Stock Photo
Notice how the picture adds to the lesson by SHOWING the students what you are explaining. This same affect could be created with a graphic and embedded into a google slides presentation about parts of a cell. Photo was found on Pexel.com and posted by Katerina Holmes

Creating graphics could also be used as a fun ASSIGNMENT to develop students technology skills. I could provide the entire class with the same template and tell them to create whatever they pleased with the template they were provided. After everyone was finished I would present the class all the graphics created from the same template to demonstrate how even though we all started with the same product our finished projects were different. This could be a fun way to teach my class how everyone is unique and could be a stepping stone into a lesson on perspectives and how everyone sees the world differently.

Some FEATURES on canva I really enjoyed are:

  • templates
  • elements (super fun to add eye catching details)
  • uploads (you can upload your own photos within the website)
  • so many font and colour choices for the text
  • they have a great share feature if you were working in a group
  • lots of features can be used for FREE (pro available at a cost for full access to more options and features)

The most important thing I learned this week was how FUN it is to get involved and create your very own graphics!!!

Epic In-Situ with Epic Books- Week 5

Today I got the opportunity to teach a new skill using technology with a group of students at the local Elementary School! We received a warm welcome into the classroom by a lovely group of students. I have to say I was a little nervous to be introducing epic books to kids when I had only used the program once myself. When using technology as a tool in educating children there is always a higher risk that something will go wrong. For example the program may not start, the internet could crash and kids typically take a longer time than anticipated to login and find the site. I can mitigate this risk as an educator by always having a backup plan prepared for the class in case the worst happens and making sure I know the resources available at the school if I do run into any technology issues!

Overall I had a WONDERFUL experience showing the kids how to use epic books and I am so grateful for the opportunity. I did notice that the touch screen laptops at the school caused some additional challenges with group work as one kid would be using the mouse to search for a topic of books and their partner would see a book they liked and take over control by touching the screen. This was a frustrating obstacle I had not foreseen but this feature can be used to help the students work on collaboration. Next time I would go over the expectations with the students before I brought out the computers. I would go about this by setting clear guidelines that one student controlled the laptop at a time and we did not touch the screen when it was not our turn!

I enjoy that epic books provides a vast selection of books which creates lots of excitement in the classroom but I found that the kids had a very hard time focusing on one book long enough to finish before getting distracted by different books. Typically during reading time the kid would select a book from the classroom library and head back to their desk away from all the other options allowing for clear focus on the single book in front of them. With epic books my students were on to the next book before finishing the one they had started.

Epic books does a good job limiting this by giving points to the students when they click finished. This is a great feature to help the kids want to get to the end of the book! Some of the books also have quizzes at the end to assist the students ability to comprehend the book they just read. Teachers can also see how long a student takes to finish reading each book. Each of these features is an unique tool for assessing how well each student stays on track and I would use this information to direct my attention to which student needs additional encouragement at that time. The online resource is also a great way to help keep track of my students interests by showing me which books they are reading and I can use this information to develop personalized connections with my students.

Given my experience today I would absolute use epic books in my own classroom with some limitations. I would be sure to still have a fully stocked library with physical book options but I would enjoy having special reading days where the kids got to use the computers for reading time and have a chance to earn points and medals on their very own epic books account.

Practicing with Screencastify- Week 4

During class this week I was introduced to the tool Screencastify and how it could be used in an educational setting to promote learning! I found that one of the most significant advantages of using video in the classroom is that it is fun! Incorporating mixed media in the middle of a slide show for example is a silly way to grab the attention of your students if you need to present long pieces of information without activities and movement to break up the lecture. Screencastify is a simple way to record short voice video with screen sharing technology. Below is a QR code that will bring you to my very first Screencastify video, please follow the link and check it out!

Ms.Johnson on Epic Book: Exploring my library

Challenges:

  1. The first issue I ran into while creating this video is sound quality. It is very important to remove yourself from any loud generators or external noises in order for the focus it be on your voice!
  2. I also created this video freestyle while using the screen sharing technology but next time I would better outline a script before recording to ensure clarity and professionalism within the clip.

It was a very easy process to create and with more practice it could be an excellent tool in the classroom! Please be aware that Screencastify must be used on Google Chrome or Microsoft Edge and you will need to sign in with google to use the application!

For this clip I choose to use the editing features within the free version of the application and found there were very few options to edit the clip. I was able to add a title page and cut out and mistakes in the clip but the editing software was not user friendly and I was not pleased with my end result. Next time I would export the clip and load it into an external editing software like imovie to play around with more features and try to uplift the content.

Overall I was very please by Screencastify as a tool for learning! It is easy to use, a new and fun way to provide information to students and easy to provide a link so students can watch the video over and over! This could be an excellent way to take important but dry information and show it to the kids in a way that they an continuously look back on! This tool could also be used to share pieces of what is happening within the classroom with parents in a new and personalized way.

The Importance of Being Media Literate- Week 3

I am grateful to have been introduced to Jesse Miller’s: Revaluate, Rethink, Release Ted talk produced by TEDxWestVancouverED as it provided excellent insight on how our modern day use of technology is affecting our children and how we need to do better.

Miller does an excellent job on focusing on the POSITIVE CHANGES we can introduce to society to use media to stimulate and entice our children’s education. He also discusses the importance of children being media literate in order to protect themselves online.

Miller states that as society we have started to focus on teaching our children about the dangers of predictors and privacy online but we fail to prepare our kids for the consequences of their actions online. As parents and/or educators it is our responsibility to ensure kids understand that what they post online will follow them forever. We are at a point where most grownups know that once something is posted online it may never be fully deleted, but when are we teaching this to our kids?

Professionalism online is something I was introduced to after I was already grown and applying for jobs. If I had been taught about what is appropriate to be posting online and what should remain private at a younger age I would be better prepared to enter the world as a young professional. This online history is our digital footprint and what we put into the world is a large part of how we will be judged by people we have never even met. How we express ourselves online will have lasting affects on the jobs we get, the people we interact with and our reputation forever. As children continue to use technology at a young age the time to develop their digital footprint increases and so as Miller claims it is imperative that we teach our children what is acceptable to post and when it is time to put their phone down. Please check out the Ted talk for yourself below, it is only fifteen minutes and well worth your time!

TEDxWestVancouverED Jesse Miller: Revaluate, Rethink, Release.

After watching this Ted talk and hearing Jesse Miller discuss the importance of ensuring our children are media literate I started to think about how I can do my part to protect children online.

  • I feel one of the most important things I can be doing is using technology in appropriate ways within the classroom to help children engage with their lessons in new and exciting ways. By demonstrating and sharing different learning tools online I can help children access technology in meaningful ways.
  • By using these programs in a classroom environment I can lead by example and explain appropriate boundaries online and explain to the kids why we are using media for this lesson plan and then explaining why we may not chose to use our technology for a different activity.
  • Technology gives us access to information we could only dream off before and it is an amazing tool for the classroom. By constantly teaching our children when to engage with technology and demonstrating how to professionally use social media we are opening up many doors for our children’s future.

As an educator I vow to find new and exciting ways to use blogs, websites, social media to connect my students to the world. I believe that by demonstrating appropriate behaviors with technology I can do my part to help children understand the consequences of technology while still understanding the privilege’s it allows us.

Most Likely to Succeed Film- Week 2

This week I watched Most Likely to Succeed (2015) directed by Greg Whiteley and I must say it is a great watch. The film explores schools that have taken big risks in education and managed to get some shocking results. The film follows a San Diego based public charter school called High Tech High that uses a project based approach to learning rather than the exam based education most of us grew up with.

These projects kept kids ENGAGED in what they were learning but more importantly it allowed the kids to take charge of their own learning. This hands on approach gave the kids opportunities to explore open ended questions and create cross curricular projects to demonstrate their learning. These projects were chosen, designed and created entirely by the kids.

When something went wrong it was on the students to problem solve and explore different solutions to fix the project. At the end of the term these projects are shown off to the local community, instead of one teacher grading the work the entire community can see and learn from what is taking place at High Tech High.

This deviation from a strict curriculum allows educators the freedom to focus on what is exciting to the students.

Photo found on Unsplash by Jon Tyson

The teachers at the public charter are on one year contracts which encourages innovation and the need for continued passion and motivation to continue learning and growing along side the kids.

This project based style of learning PREPARES the kids for the real world by giving them skills in communication, work ethic, leadership and teamwork. When one student did not pull their weight the entire project would fall apart and everyone needed to come together to complete the project on time. This approach to teaching did not focus on memorizing facts, instead the kids were pushed outside their comfort zone and as a result they learned why the information was important rather then just forcing the facts to memory.

This depth of knowledge is shown to stay with a person longer then merely memorizing the information for an exam. This style of learning gave the kids opportunities to fail in a safe environment so they could learn from their mistakes without fear of repercussions in the form of bad grades. While parents were concerned that this method of teaching may prepare them for the work force, they were unsure how it would get them into a good college. The risk of exploring deeper education did pay off as High Tech High students still test above the state average in SAT scores despite their education not being focused around memorizing and prep for the test.

I learned that the job opportunities in our nation are changing to be focused around technology and creativity. Being given a chance to explore and create without limitations or judgement should be the bases of our education system.

As the world changes it is our duty as educators to change with it, project based learning gives kids a chance to receive hands on experience that will prepare them for the new exciting job opportunities in a technology forward nation.